Blog Details
- Home
- Blog Details
A Step-by-Step Guide (2025) to Testing Home Water Pressure
Maintaining optimal water pressure in your home is crucial not just for comfort—but for the health and efficiency of your entire plumbing system. Low water pressure can turn showers into a trickle, while high pressure can damage pipes and appliances over time. That’s why understanding how to test your home water pressure is a must for every homeowner.
At Saint Pete Plumbing, we specialize in diagnosing and resolving pressure issues for homes throughout the St. Petersburg area. This comprehensive guide walks you through how to test your water pressure at home, tools you’ll need, ideal pressure ranges, common causes of irregularities, and when to call a professional.
Table of Contents
- What Is Home Water Pressure?
- Why Testing Water Pressure Matters
- Tools You’ll Need
- Ideal Water Pressure Range
- Step-by-Step Guide to Testing Water Pressure
- How to Interpret Your Results
- Common Causes of High or Low Water Pressure
- Solutions to Water Pressure Issues
- When to Call a Professional
- Final Thoughts from Saint Pete Plumbing
What Is Home Water Pressure?
Water pressure is the force that pushes water through your pipes and out of your faucets, showerheads, and appliances. It’s typically measured in pounds per square inch (PSI).
Water pressure is influenced by several factors, including:
- Your home’s elevation relative to the water source
- Municipal water supply pressure
- Condition of your plumbing system
- Presence of a pressure-reducing valve (PRV)
Too much or too little water pressure can lead to plumbing problems and increased utility bills.
Why Testing Water Pressure Matters
Testing your water pressure helps you:
- Maintain plumbing performance (e.g., strong showers)
- Protect appliances like dishwashers and washing machines
- Prevent pipe damage that could lead to costly repairs
- Diagnose issues like low water flow, leaks, or bursts
- Comply with building codes or insurance inspections
Most homeowners aren’t aware they have a pressure issue until a pipe bursts or their water heater fails. Regular testing can prevent these headaches.
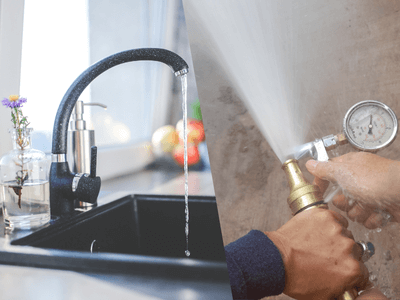
Tools You’ll Need
You don’t need to be a professional plumber to test your water pressure. All you need is a water pressure gauge, which you can find at most hardware stores or online for $10–$25.
Ideal Gauge Features:
- PSI readings from 0 to at least 150
- Rubber gasket for a tight seal
- Optional: dual dial for BAR and PSI, leak indicator
Ideal Water Pressure Range
According to plumbing standards and municipal guidelines, residential water pressure should be between:
40 to 80 PSI (pounds per square inch)
- Below 40 PSI: Too low — may result in weak water flow
- 50–60 PSI: Ideal range for most homes
- Above 80 PSI: Too high — can damage pipes, valves, and appliances
Step-by-Step Guide to Testing Water Pressure
Follow these detailed steps to accurately measure your home’s water pressure.
Step 1: Find an Exterior Faucet
Look for an outdoor hose bib, preferably one closest to your main water line. This gives the most accurate reading of your home’s incoming pressure, without internal plumbing variables.
If an outdoor spigot isn’t accessible, use a faucet that’s not connected to a water filter or softener.
Step 2: Turn Off All Water-Using Appliances
To get an accurate baseline pressure reading, turn off:
- Washing machine
- Dishwasher
- Sprinkler system
- Showers and taps
- Ice makers or water filters
This ensures that no running water affects the pressure during testing.
Step 3: Attach the Water Pressure Gauge
- Remove any hose or attachment from the spigot.
- Screw the gauge tightly onto the faucet.
- Make sure the rubber gasket is in place to prevent leaks.
Hand-tight is usually sufficient, but make sure it’s snug.
Step 4: Turn On the Faucet Fully
- Open the faucet all the way.
- Watch the dial on the gauge immediately.
The needle will jump and settle at a pressure reading. This is your static pressure—the pressure when no water is being used elsewhere in the home.
Step 5: Record the PSI Reading
- Take note of the reading.
- If your gauge has a maximum pressure indicator, check that too.
Leave it running for a minute or two to ensure it remains stable.
Step 6 (Optional): Test at Multiple Points
To identify inconsistencies:
- Test multiple spigots or interior faucets
- Repeat the process when appliances are in use to get a dynamic pressure reading
- Test at different times of day (peak use vs. late night)
How to Interpret Your Results
Here’s how to understand your reading:
| PSI Range | Interpretation | Action Needed? |
| 0–39 | Low pressure | Yes |
| 40–49 | Slightly low, still acceptable | Possibly |
| 50–60 | Ideal residential pressure | No |
| 61–80 | High-normal range | Monitor |
| 81 | Excessive — can cause pipe damage | Yes |
Anything above 80 PSI is usually a red flag.
Common Causes of High or Low Water Pressure
Let’s explore what might be affecting your home’s water pressure:
Causes of Low Pressure
- Corroded or clogged pipes
- Leaking supply lines
- Malfunctioning pressure-reducing valve (PRV)
- Municipal supply issue
- Faulty water meter
- Shared water lines in apartments or older homes
Causes of High Pressure
- Municipal supply pressure too high
- Broken or missing PRV
- Poorly installed plumbing system
- Sudden surge from city supply
- Recent construction or changes in supply lines
Solutions to Water Pressure Issues
You’ve tested the pressure—now what? Here are some common fixes:
For Low Pressure
- Check for leaks: Even a small drip can reduce overall pressure.
- Clean faucet aerators and showerheads to remove mineral buildup.
- Replace old pipes if corrosion is detected.
- Install a booster pump if municipal supply is weak.
- Adjust or replace the PRV if applicable.
For High Pressure
- Install a Pressure-Reducing Valve (PRV): Brings PSI down to safe levels.
- Check expansion tank on water heater to absorb excess pressure.
- Monitor pressure regularly with a permanent gauge or smart meter.
- Schedule annual plumbing inspection to keep things under control.
When to Call a Professional
While DIY testing is a great first step, call Saint Pete Plumbing if you notice:
- Water pressure above 80 PSI consistently
- Sudden drops or spikes in pressure
- Banging noises (water hammer)
- Leaking or burst pipes
- Repeated appliance breakdowns
- Inconsistent pressure in different areas of the home
We use advanced diagnostics to pinpoint the root cause and offer lasting, code-compliant solutions.
Final Thoughts from Saint Pete Plumbing
Water pressure plays a crucial role in your home’s plumbing system—impacting everything from how well your shower works to how long your appliances last. Regular testing helps you stay ahead of major issues.
At Saint Pete Plumbing, we recommend testing your water pressure at least once a year, or whenever you notice:
- Weak flow from faucets
- Loud banging or rattling pipes
- Leaking seals or valves
- Unexpected changes in utility bills
Need help with testing or adjusting your home water pressure? Contact Saint Pete Plumbing today and let our licensed professionals handle it with expertise and care.
Call Us: (727 ) 800- 7667
Visit Us: https://www.saintpeteplumbing.
Serving St. Petersburg, Clearwater, and surrounding areas
Recent Posts
Recent Comments
Categories
- Aerobic Septic Tank
- appliance
- Bathroom
- Bathroom Plumbing
- Burst Pipe
- Commercial Plumbing
- Dishwasher
- Drain Cleaning
- Drain Heater
- Emergency Plumbing
- Faucet
- flood
- Garbage Disposal
- Garden Hose
- Home Water Pressure
- house clean
- Leak Repair
- Low Water Pressure
- New Home Plumbing
- pipe repair
- Plumbing
- Plumbing Checklist
- Plumbing Services
- Plumbing Tips
- Residential Plumbing
- Restoration
- Septic Tank
- Sewage
- Sewer Backup
- Shower
- Shower Cartridge
- Sump Pumps
- Thermostatic
- Toilet
- Toilet Seal
- Toilet Tank
- Trap Primer
- Vent Pipes Plumbing
- video inspection
- Water Heaters
- Water Softening
Tags
- 24 hour commercial plumbing
- 24 Hour Emergency
- 24 hour faucet installation st petersburg
- 24 Hour Plumbing Services
- 24 hour residential plumbing
- affordable solutions
- Appliance Repair
- appliance repair and installation
- appliance repair service
- Appliance Repair St. Petersburg
- Best Water Damage Restoration
- Build
- Clean
- clean water
- clogged drain
- Commercial Plumbing
- Commercial plumbing services
- Design
- Dishwasher Installation
- Drano doesn't work
- Emergency Flood Damage Repair
- faucet installation
- Faucet Installation Cost Guide
- faucet repair
- Fix Leaky Faucet
- Flood Restoration
- Florida Sewage Backup
- Frozen Pipe
- Frozen Pipe Repair
- Garbage Disposal Plumbing
- Garbage Disposal Repair
- Garden Hose Leaking
- Garden Hose Repair
- How to fix a leaking hose pipe
- installation
- leaky faucet in St. Petersburg
- low water pressure
- Low Water Pressure and Dripping Faucets
- Pipe Repair
- pipe Replacement
- Plumber in Pinellas Park FL
- Plumber in St. Petersbur
- Plumbers St. Petersburg
- Plumbing Services
- plumbing services in Pinellas
- Plumbing Video Camera
- prevention services
- Re-Piping
- Repair
- Residential Plumbing
- residential plumbing services
- Restoration Contractors
- Roof
- Rooftop
- Services
- Sewage Backup Cleanup
- Sewage Cleanup Services
- Sewer Camera Inspection
- Softening & Filtration Systems
- St Petersburg Restoration Services
- Sump Pump Installation
- sump pump repair
- Sump Pumps
- Toilet Repair
- Trenchless pipe repair
- Underground pipe relining
- Underground Pipe Repair without Digging
- video inspection camera
- Washing Machine Repairs
- water damage restoration
- Water Extraction
- Water removal & extraction
- Water Softening
Popular Feeds
Get In Touch
Tags
- 24 hour commercial plumbing
- 24 Hour Emergency
- 24 hour faucet installation st petersburg
- 24 Hour Plumbing Services
- 24 hour residential plumbing
- affordable solutions
- Appliance Repair
- appliance repair and installation
- appliance repair service
- Appliance Repair St. Petersburg
- Best Water Damage Restoration
- Build
- Clean
- clean water
- clogged drain
- Commercial Plumbing
- Commercial plumbing services
- Design
- Dishwasher Installation
- Drano doesn't work
- Emergency Flood Damage Repair
- faucet installation
- Faucet Installation Cost Guide
- faucet repair
- Fix Leaky Faucet
- Flood Restoration
- Florida Sewage Backup
- Frozen Pipe
- Frozen Pipe Repair
- Garbage Disposal Plumbing
- Garbage Disposal Repair
- Garden Hose Leaking
- Garden Hose Repair
- How to fix a leaking hose pipe
- installation
- leaky faucet in St. Petersburg
- low water pressure
- Low Water Pressure and Dripping Faucets
- Pipe Repair
- pipe Replacement
- Plumber in Pinellas Park FL
- Plumber in St. Petersbur
- Plumbers St. Petersburg
- Plumbing Services
- plumbing services in Pinellas
- Plumbing Video Camera
- prevention services
- Re-Piping
- Repair
- Residential Plumbing
- residential plumbing services
- Restoration Contractors
- Roof
- Rooftop
- Services
- Sewage Backup Cleanup
- Sewage Cleanup Services
- Sewer Camera Inspection
- Softening & Filtration Systems
- St Petersburg Restoration Services
- Sump Pump Installation
- sump pump repair
- Sump Pumps
- Toilet Repair
- Trenchless pipe repair
- Underground pipe relining
- Underground Pipe Repair without Digging
- video inspection camera
- Washing Machine Repairs
- water damage restoration
- Water Extraction
- Water removal & extraction
- Water Softening

Categories
- Aerobic Septic Tank
- appliance
- Bathroom
- Bathroom Plumbing
- Burst Pipe
- Commercial Plumbing
- Dishwasher
- Drain Cleaning
- Drain Heater
- Emergency Plumbing
- Faucet
- flood
- Garbage Disposal
- Garden Hose
- Home Water Pressure
- house clean
- Leak Repair
- Low Water Pressure
- New Home Plumbing
- pipe repair
- Plumbing
- Plumbing Checklist
- Plumbing Services
- Plumbing Tips
- Residential Plumbing
- Restoration
- Septic Tank
- Sewage
- Sewer Backup
- Shower
- Shower Cartridge
- Sump Pumps
- Thermostatic
- Toilet
- Toilet Seal
- Toilet Tank
- Trap Primer
- Vent Pipes Plumbing
- video inspection
- Water Heaters
- Water Softening
Get In Touch


Leave a comment