Blog Details
- Home
- Blog Details
How Thermostatic Mixing Valve Works & Installation Guide
Ensuring a consistent and safe water temperature is critical in homes, commercial buildings, and healthcare facilities. Sudden temperature fluctuations can cause discomfort or even serious burns, especially for children and the elderly. This is where a thermostatic mixing valve (TMV) comes in. TMVs regulate hot and cold water to deliver water at a safe, pre-set temperature, offering both comfort and protection.
At Saint Pete Plumbing, we frequently install and maintain thermostatic mixing valves to enhance safety and efficiency. This comprehensive guide will explain how TMVs work, their benefits, and a step-by-step installation process.
What is a Thermostatic Mixing Valve?
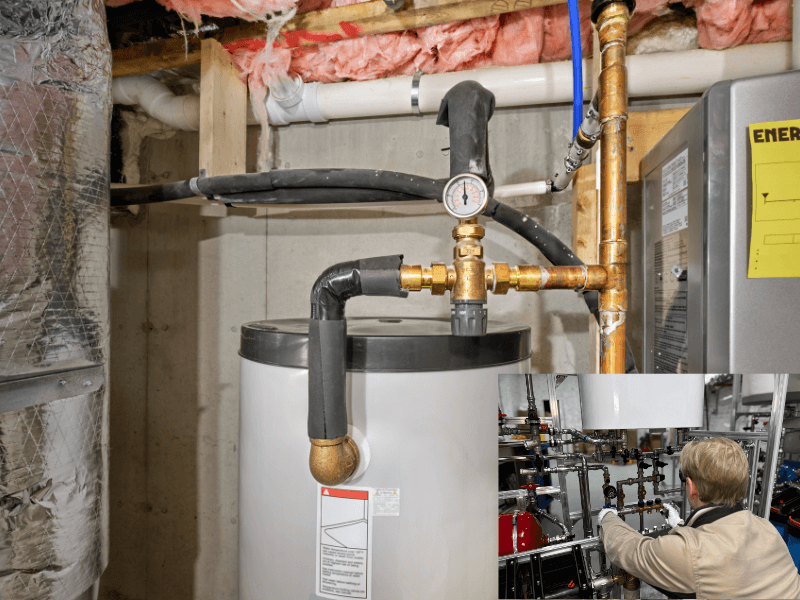
A thermostatic mixing valve is a plumbing device that blends hot and cold water to a predetermined, consistent temperature before it reaches the faucet, shower, or other fixtures. Unlike standard mixing valves, which rely solely on water pressure, TMVs use a thermostatic element to maintain a steady output temperature even if there are changes in supply pressure or temperature.
TMVs are commonly used in:
> Residential showers and bathtubs
> Commercial kitchens and restrooms
> Hospitals, nursing homes, and childcare facilities
> Industrial applications requiring precise temperature control
How a Thermostatic Mixing Valve Works
A TMV is designed to sense and adjust the water temperature automatically. Here’s how it functions:
✔Thermostatic Element: The core component is a thermostatic element that expands or contracts in response to temperature changes in the mixed water.
✔Balancing Hot and Cold Water: When the temperature rises above the set point, the valve reduces hot water flow. If the temperature drops, it increases hot water flow, maintaining the desired output.
✔Safety Mechanism: Many TMVs include a failsafe shutoff that stops hot water flow entirely if the cold water supply fails, preventing scalding.
Key benefit: Even if someone flushes a toilet or uses another faucet, the TMV keeps the shower or tap at a safe, constant temperature.
Benefits of Thermostatic Mixing Valves
Installing a TMV offers several advantages:
> Scald Prevention: Protects children, elderly, and vulnerable individuals from hot water burns.
> Consistent Comfort: Eliminates sudden temperature fluctuations, providing a stable water temperature.
> Water Efficiency: Reduces water wastage by quickly reaching the desired temperature without trial and error.
> Compliance: Many building codes require TMVs in hospitals, schools, and public facilities.
> Longevity of Fixtures: Prevents damage caused by extreme water temperatures in pipes and appliances.
TMVs are an essential safety feature in modern plumbing systems.
Types of Thermostatic Mixing Valves
Understanding the types of TMVs helps select the right valve for your needs:
1. Manual TMVs: Allow you to set the desired temperature manually, typically used in residential settings.
2. Automatic TMVs: Maintain temperature automatically, adjusting to changes in supply pressure and temperature.
3. Concealed TMVs: Installed behind walls or cabinets for aesthetic purposes, commonly used in showers.
4. Surface-Mounted TMVs: Visible valves for easy access, often installed in commercial or healthcare facilities.
Tip from Saint Pete Plumbing: Choose a valve with a temperature range suitable for your application, typically 100–120°F for residential use.
Tools and Materials Needed for Installation
Installing a thermostatic mixing valve requires proper tools and materials:
Tools:
> Pipe wrench or adjustable wrench
> Pipe cutter or hacksaw (for new installations)
> Screwdrivers (flathead and Phillips)
> PTFE (Teflon) tape
> Pipe sealant or joint compound
> Level and measuring tape
Materials:
> Thermostatic mixing valve (correct size and type for your system)
> Copper, PEX, or CPVC piping as required
> Fittings (elbows, unions, adapters)
Safety tip: Always shut off the water supply before starting any plumbing work.
Step 1: Shut Off Water Supply
Before beginning installation, turn off both hot and cold water supplies to prevent leaks or injury.
> Locate the main shut-off valves for the area or building.
> Open a faucet downstream to drain residual water.
Tip: Using a bucket or towel helps catch leftover water in the pipes.
Step 2: Choose the Installation Location
The location of the TMV is critical for proper function:
> For showers or bathtubs, install as close as possible to the fixture to minimize heat loss.
> In commercial applications, place near water heaters or central mixing points.
> Ensure the valve is accessible for future maintenance.
Note: Some TMVs require a minimum inlet pressure to function correctly; check manufacturer guidelines.
Step 3: Prepare the Pipes
Proper preparation ensures a leak-free installation:
> Cut the hot and cold water pipes to the required length.
> Remove any burrs or rough edges.
> Clean pipe ends thoroughly.
Tip: Use PTFE tape or joint compound on threaded connections to prevent leaks.
Step 4: Install the Thermostatic Mixing Valve
Follow these steps carefully to install the TMV:
> Orientation: Ensure the valve is oriented correctly. Most TMVs are labeled H for hot, C for cold, and M for mixed water.
> Connect Inlets: Attach the hot and cold water supply lines to the appropriate inlets.
> Connect Outlet: Connect the mixed water outlet to the downstream fixture or piping.
> Secure the Valve: Tighten all fittings using a wrench. Do not overtighten, as this can damage the valve.
Pro tip: Verify the valve is level and accessible before final tightening.
Step 5: Set the Desired Temperature
After installation, adjust the valve to the desired output temperature:
> Most TMVs have a temperature adjustment knob or screw.
> Use a thermometer to measure water temperature at the fixture.
> Adjust gradually until you reach the target temperature, usually between 100°F and 120°F for residential applications.
Safety tip: Avoid setting the temperature above 120°F to prevent scalding.
Step 6: Test the Thermostatic Mixing Valve
Testing ensures proper function and safety:
1. Turn on both hot and cold water supplies.
2. Open the fixture to which the TMV is connected.
3. Observe the water temperature for several minutes while other faucets or appliances are in use.
4. Check for leaks at all connections.
If the temperature fluctuates significantly, readjust the valve or inspect for installation errors.
Step 7: Maintenance Tips for TMVs
Thermostatic mixing valves require minimal but regular maintenance to ensure longevity:
> Check annually: Inspect for leaks, corrosion, or mineral buildup.
> Clean or replace filters: Many TMVs have inlet strainers to prevent debris from affecting performance.
> Test temperature regularly: Ensure the valve maintains the desired output.
> Replace faulty valves promptly: A malfunctioning TMV can pose scald risks.
Tip: In areas with hard water, descaling the valve periodically helps maintain smooth operation.
Common Questions About TMVs
Q: Can I install a TMV myself?
A: Basic installations in residential systems are feasible for experienced DIYers, but commercial or complex systems should be handled by licensed plumbers.
Q: Do TMVs reduce water pressure?
A: Slight pressure drop is normal, but a properly sized valve should not noticeably affect flow.
Q: How long does a TMV last?
A: With proper maintenance, most valves last 10–15 years. Hard water or lack of maintenance can shorten lifespan.
Q: Are TMVs required by building codes?
A: Many codes, especially for healthcare, childcare, and commercial facilities, mandate TMVs to prevent scalding.
When to Call a Professional
While TMV installation is straightforward for some homeowners, professional help is recommended in these situations:
> Retrofitting an older plumbing system
> Installing multiple valves for large buildings
> Replacing a valve in a concealed wall or hard-to-reach location
> Ensuring compliance with local plumbing codes
Saint Pete Plumbing provides expert installation and maintenance, ensuring your TMVs operate safely and efficiently.
Conclusion
A thermostatic mixing valve is an essential component for safe, comfortable, and efficient water temperature control. By blending hot and cold water to a consistent, pre-set temperature, TMVs protect your family and property from scalding while enhancing water efficiency.
Following the installation steps provided by Saint Pete Plumbing, you can ensure a proper, leak-free setup and reliable performance. Regular maintenance, temperature testing, and timely replacement will keep your TMV functioning optimally for years to come.
Whether you’re installing a TMV in a new home, retrofitting an existing bathroom, or ensuring code compliance in a commercial building, our licensed plumbers are ready to provide professional guidance, expert installation, and ongoing support.
Saint Pete Plumbing is dedicated to providing high-quality plumbing services across St. Petersburg and surrounding areas. From TMV installation to complete plumbing system maintenance, we combine expertise, precision, and customer-focused service to deliver safe and reliable solutions for every home and business.
📞 Call Saint Pete Plumbing at (727) 800- 7667
🌐 Book Your Appointment Online at – www.saintpeteplumbing.com
📍 Serving All of St. Petersburg, Gulfport, and Pinellas County
Recent Comments
Categories
- Aerobic Septic Tank
- appliance
- Bathroom
- Bathroom Plumbing
- Burst Pipe
- Commercial Plumbing
- Dishwasher
- Drain Cleaning
- Drain Heater
- Emergency Plumbing
- Faucet
- flood
- Garbage Disposal
- Garden Hose
- Home Water Pressure
- house clean
- Leak Repair
- Low Water Pressure
- New Home Plumbing
- pipe repair
- Plumbing
- Plumbing Checklist
- Plumbing Services
- Plumbing Tips
- Residential Plumbing
- Restoration
- Septic Tank
- Sewage
- Sewer Backup
- Shower
- Shower Cartridge
- Sump Pumps
- Thermostatic
- Toilet
- Toilet Seal
- Toilet Tank
- Trap Primer
- Vent Pipes Plumbing
- video inspection
- Water Heaters
- Water Softening
Tags
- 24 hour commercial plumbing
- 24 Hour Emergency
- 24 hour faucet installation st petersburg
- 24 Hour Plumbing Services
- 24 hour residential plumbing
- affordable solutions
- Appliance Repair
- appliance repair and installation
- appliance repair service
- Appliance Repair St. Petersburg
- Best Water Damage Restoration
- Build
- Clean
- clean water
- clogged drain
- Commercial Plumbing
- Commercial plumbing services
- Design
- Dishwasher Installation
- Drano doesn't work
- Emergency Flood Damage Repair
- faucet installation
- Faucet Installation Cost Guide
- faucet repair
- Fix Leaky Faucet
- Flood Restoration
- Florida Sewage Backup
- Frozen Pipe
- Frozen Pipe Repair
- Garbage Disposal Plumbing
- Garbage Disposal Repair
- Garden Hose Leaking
- Garden Hose Repair
- How to fix a leaking hose pipe
- installation
- leaky faucet in St. Petersburg
- low water pressure
- Low Water Pressure and Dripping Faucets
- Pipe Repair
- pipe Replacement
- Plumber in Pinellas Park FL
- Plumber in St. Petersbur
- Plumbers St. Petersburg
- Plumbing Services
- plumbing services in Pinellas
- Plumbing Video Camera
- prevention services
- Re-Piping
- Repair
- Residential Plumbing
- residential plumbing services
- Restoration Contractors
- Roof
- Rooftop
- Services
- Sewage Backup Cleanup
- Sewage Cleanup Services
- Sewer Camera Inspection
- Softening & Filtration Systems
- St Petersburg Restoration Services
- Sump Pump Installation
- sump pump repair
- Sump Pumps
- Toilet Repair
- Trenchless pipe repair
- Underground pipe relining
- Underground Pipe Repair without Digging
- video inspection camera
- Washing Machine Repairs
- water damage restoration
- Water Extraction
- Water removal & extraction
- Water Softening
Popular Feeds
-
Plumbing Vent Pipes: Importance & Issues
January 28, 2026 -
How Do Thermostatic Shower Valves Work?
January 23, 2026 -
Tree Roots in Your Drains? Here’s Why and What You Need to Know!
January 19, 2026
Get In Touch
Tags
- 24 hour commercial plumbing
- 24 Hour Emergency
- 24 hour faucet installation st petersburg
- 24 Hour Plumbing Services
- 24 hour residential plumbing
- affordable solutions
- Appliance Repair
- appliance repair and installation
- appliance repair service
- Appliance Repair St. Petersburg
- Best Water Damage Restoration
- Build
- Clean
- clean water
- clogged drain
- Commercial Plumbing
- Commercial plumbing services
- Design
- Dishwasher Installation
- Drano doesn't work
- Emergency Flood Damage Repair
- faucet installation
- Faucet Installation Cost Guide
- faucet repair
- Fix Leaky Faucet
- Flood Restoration
- Florida Sewage Backup
- Frozen Pipe
- Frozen Pipe Repair
- Garbage Disposal Plumbing
- Garbage Disposal Repair
- Garden Hose Leaking
- Garden Hose Repair
- How to fix a leaking hose pipe
- installation
- leaky faucet in St. Petersburg
- low water pressure
- Low Water Pressure and Dripping Faucets
- Pipe Repair
- pipe Replacement
- Plumber in Pinellas Park FL
- Plumber in St. Petersbur
- Plumbers St. Petersburg
- Plumbing Services
- plumbing services in Pinellas
- Plumbing Video Camera
- prevention services
- Re-Piping
- Repair
- Residential Plumbing
- residential plumbing services
- Restoration Contractors
- Roof
- Rooftop
- Services
- Sewage Backup Cleanup
- Sewage Cleanup Services
- Sewer Camera Inspection
- Softening & Filtration Systems
- St Petersburg Restoration Services
- Sump Pump Installation
- sump pump repair
- Sump Pumps
- Toilet Repair
- Trenchless pipe repair
- Underground pipe relining
- Underground Pipe Repair without Digging
- video inspection camera
- Washing Machine Repairs
- water damage restoration
- Water Extraction
- Water removal & extraction
- Water Softening

Categories
- Aerobic Septic Tank
- appliance
- Bathroom
- Bathroom Plumbing
- Burst Pipe
- Commercial Plumbing
- Dishwasher
- Drain Cleaning
- Drain Heater
- Emergency Plumbing
- Faucet
- flood
- Garbage Disposal
- Garden Hose
- Home Water Pressure
- house clean
- Leak Repair
- Low Water Pressure
- New Home Plumbing
- pipe repair
- Plumbing
- Plumbing Checklist
- Plumbing Services
- Plumbing Tips
- Residential Plumbing
- Restoration
- Septic Tank
- Sewage
- Sewer Backup
- Shower
- Shower Cartridge
- Sump Pumps
- Thermostatic
- Toilet
- Toilet Seal
- Toilet Tank
- Trap Primer
- Vent Pipes Plumbing
- video inspection
- Water Heaters
- Water Softening
Get In Touch


Leave a comment